Zumba

The Future Mrs. Davis

Wedding Countdown Ticker

Monday, October 7, 2013

Bridesmaids!


     So, I finally did it. I made my bridesmaid / maid of honor boxes. I procrastinated so long, but Finally got all my supplies and butt in gear. 
     I'm so excited about these! I think they turned out super cute, especially for me not being super creative. I can follow a recipe just fine, and ad-lib very well, but from scratch with nothing as a guide?? ...super difficult.

     I used cigar boxes. I painted the outsides a shade of green that we are considering for the wedding. The one on the right, Bree, is an emerald green, the left, Nikolette, is a forest green, which is the one I think we are going to go with. Sorry girls, you're boxes are a little different. ;-)
     Painting the boxes was a pain. I didn't do my homework beforehand, so I just went ahead and painted. The paint didn't dry right, then the acrylic coating got sticky, the boxes stuck to each other, and peeled off paint from the other. One box sat on a piece of scrapbook paper and I couldn't get that off. So, I sanded and repainted. So much better!

     For the name plate, I used a silver foil scrapbook paper. Cut it to an appropriate size, and used stickers for the names and designs. Then I modge-podge'd it to the top of the box.


     When you open the boxes, they are super cute! I lined the inside of the top of the box with their favorite color, did a border with the silver piping (totes forgot what they are really called). I used stamps for the letter of the "will you be" question, and stickers for the the rest. I also TRIED to make a veil to cover up the inside as well, for more decoration. The bottom, inside of the box is lined with a silver glitter paper, cut to size, which can't be seen. 
     I also painted the border of the boxes because of course I got green paint on the inside, and couldn't have that show! So the black made it easy to cover up my impatientness.
     Included in each box is a book, a mini of liquor, personalized tweezers, and a kazoo! 


     Finally, I closed the boxes, tied ribbon around them, and shipped them off! Of course Nikolette got hers on time, but Bree was out of town, and still hasn't picked it up from her apartment office. Figures. 
     Well, I am super pleased with the results, I just hope they like them too!

Thursday, August 8, 2013

Zumba Promo Code

Now you can save at zumba.com! Use Zumba promo code KDANCE4 for an extra 10% off!


You can save 10% off the sales prices by using my affiliate code KDANCE4

Zumba discount code, Zumba promo code KDANCE4 use in the affiliate box for 10% off!


Wednesday, July 17, 2013

Zumba!

     I am now an official Zumba Instructor! I'm excited to start this, but very nervous as well! I went to the certification on June 29th, and had Alfredo as my instructor. He was amazing. I've also attended a Zumba Jam session, which is only for Zumba instructors. I learned 4 new choreographed songs. The Jam instructor was Eric Aglia, who was also fantastic!  


     Now comes the hard part...dedication. I have to start memorizing the music, and memorizing/making my own choreography. I know I can do it, its just a "big" project and so I am procrastinating. 
There are quite a few awesome Zumba instructors in the central California coast, I just have to start networking! Bah, making friends has never been easy. 
     I am going to be teaching Zumba classes in the fall through the City of Lompoc Recreation! I've got a couple months before I get started, so that doesn't help me get my act together. Gotta do it tho!

And...click below for 10% off Zumba wear! Or go to Zumba.com and use my Zumba promo code KDANCE4 in the affiliate code!


Sunday, December 2, 2012

Modge Podge Flower Pots

     My sister and I came up with the idea the make a collage on a flower pot for my mom for Christmas. My mom is big into planting flowers and herbs right now. And then she sells them, along with everything else. She is a professional garage seller. So in order for her not to sell something we give her, we need to make it personalized to her.   
    I found a picture on pinterest to make the flower pots, tried it at home, and it didn't work anything like the picture looked. First of all, modge podge is a pain to work with. I've never worked with it before, then realized it takes forever to dry, and the pictures were on a curved surface, so they weren't sticking. So, we went back to good ole faithful...the hot glue gun. 
     We hot glued the pictures on the pot, and the pictures now unfortunately stick out away from the pot, instead of flush. I tried to modge podge over the finished collage to hopefully make it all flush, but that isn't working either. I know there is a clear resin type thing somewhere to make it all flush and even, but I have no idea what it is, and its probably expensive. 
     Well, we added a bow and ribbon as well. My sister put hers on with hot glue, and I used modge podge. Mine is a little smoother, but both look equally as good. 
     Hopefully mom likes them.


Wednesday, November 14, 2012

Healthy Waffles?

     I have been craving waffles, so decided to try and be healthy and make whole wheat waffles. I've had this bag of whole wheat flour just waiting to be used, so why not?
     Searching through pinterest this morning, I remembered I had posted a waffle recipe already, and I wanted to try it. My boyfriend was once again still sleeping, so I snuck out of bed and followed this recipe.
     As I was mixing it all, I realized my sister had not bought milk last night as she said she would, so in my waffles I used 1 cup 2% milk and 2/3 cup unsweetened almond milk.
As I don't have an official waffle iron, I busted out with using the George Foreman. I think it worked well. This is a picture of the second batch, just a little short on the batter.
     I also topped my waffles with creamy peanut butter, half of a banana and just a little bit of syrup.
     Overall they turned out ok. They tasted like a healthy waffle, but a little rubbery and thick, but so very filling. We each only ate half of one and are very satiated. I think that is a success.


  • 1 1/2 cups whole grain pastry flour
  • 1/2 cup rolled oats
  • 1/2 teaspoon baking powder
  • 1/2 teaspoon baking soda
  • 1/2 teaspoon salt
  • 1 2/3 cups fat-free milk
  • egg whites
  • 3 tablespoons packed brown sugar
  • 1 tablespoon vegetable oil
  • 2 cups blueberries
  • 1 1/2 cups sliced strawberries
  • 1/2 cup maple syrup

Directions


1. Preheat the oven to 200°F. Coat a baking sheet with cooking spray.
2.
In a large bowl, combine the flour, oats, baking powder, baking soda, and salt.
3.
In a medium bowl, combine the milk, egg whites, brown sugar, and oil. Add to the flour mixture and stir just until blended. Fold in 1 cup of the blueberries.
4.
Coat a nonstick waffle iron with cooking spray. Preheat the iron.
5.
Pour 1/2 cup of the batter onto the center of the iron. Cook for 5 minutes, or until steam no longer escapes from under the waffle-iron lid and the waffle is golden. Place the waffles on the prepared baking sheet and place in the oven to keep warm.
6.
Repeat with the remaining batter to make a total of 8 waffles.


Saturday, July 14, 2012

Alternate breakfasts

     I was pinteresting this morning, and I think I'm going to restart my losing weight train. I know healthy food is tasty, I just need to get off my lazy butt and do something. I think if I keep moving, it wont be such a bad idea that I am moving and cooking and exercising and making myself feel better. When I have a lazy day, it turns into this cycle that I can't get out of. So, tomorrow morning I'm up by 8. It will be hard, but worth it. :)
I found this yummy looking smoothie recipe this morning here, and I want to try it. I'll keep you updated....


So, a little over a week later and I'm finally talking about my smoothies. I have started making them, adding a scoop of protein for the after workout smoothie, and really overall enjoying them.
I found this smoothie post on pinterest, and decided this was the way to do it. spend one day freezing and preparing, making the rest of the work easy peasy.


I did  really well on preparing and cutting up all of the fruit. I even put the yogurt in the mini muffin pan like the post said to do.  And then my boyfriend got involved...


Now I had to start all over with the fruit.


     The second batch doesn't look as good, but I was in a frustrated hurry. I lined a baking sheet with parchment paper and cut up about 6 strawberries, 1 banana and 2 kiwis. I only had one mango, and that ended up on the floor. I hated cutting up the mango (as I am not familiar with them at all) so I was not about to go buy another one. 
     Once all the fruit was frozen and the yogurt was frozen I separated them into freezer bags. A large handful of strawberries, one slice of banana, 4 slices of kiwi, and three mini muffin frozen yogurts per bag. I have been using them all week. I just dump the bag into the blender, add a scoop of protein powder, and about a half cup of milk. If I have some pomegranate juice or orange juice, I will add about a quarter cup of that as well. Turns out as a delicious and yummy breakfast smoothie that is healthy too. But so much for that getting up at 8am thing...

Wednesday, July 11, 2012

Salads!

     I don't know why it took me so long to make this amazing salad. If I would have known it was SO DAMN EASY, I would have been eating a lot of it long ago. I get like that though, afraid to venture out to do or buy some things.
     Well, I finally made my first purchase of mozzarella cheese. I have been growing a basil plant, and have started (thanks to my boyfriend) cooking with olive oil.


     This plate is only one roma tomato! and I sliced the sliced mozzarella in half, so as not to overpower the tomato. A leaf or two of basil, washed, in between the cheese and tomato. Then i sprinkled a little salt over the entire thing. This salt step is huge for me, as I don't add salt to anything, I even go out of my way to buy low sodium items. Then i drizzled a little olive oil and balsamic vinegar over the whole thing. Mmmm!

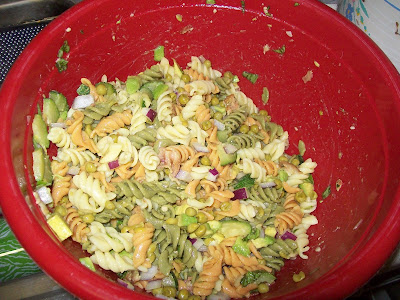
     Also, last night, I ventured into making my first homemade pasta salad. I usually buy the boxes of Suddenly salad and add my own few twists to them, but this one was all from scratch! I started with this recipe, but here is what I ended up with:

8 ounces Garden rotini noodles
1 large avocado, halved, seeded, chopped, peeled
4 slices bacon, crisp cooked, drained and crumbled
1/4 cup fresh chopped basil
2 tablespoons lemon juice
1 tablespoon olive oil
4 cloves minced garlic
1 medium zucchini, coarsly chopped
1 can peas
1/4 red onion

Directions:
  1. Cook pasta according to package. While pasta is cooking, empty can of peas into pot and add zucchini, on low heat. Heat until zucchini is slightly tender.
  2. In large bowl, combine avocado, bacon, basil, lemon juice, olive oil, garlic, and onion.
  3. Drain pasta, peas and zucchini. Add to large bowl and mix all ingredients together. Serve.


     I totally forgot the cheese that the original recipe called for, but it was delicious nonetheless. I am thinking next time of adding chunks of mozzarella. I also think the onions were a little crunchy for the rest of the salad, but their taste was a good addition. I will definitely make this again.